

Arguably one of the most basic forms of animation is the sliding cel, which is the lateral, vertical or rotation movement of artwork on a sheet of celluloid under an animation camera photographed one frame at a time to produce movement. This technique, although around since the early days of the industry, was used very sparingly at the Walt Disney Studios where they were known for high-quality classic animation in which each frame was painstakingly drawn by hand. It wasn’t until the advent of television animation in the 1950s and ‘60s that the sliding cel method became a ubiquitous technique for time and budget efficiency. Yet, when the sliding cel techniques was used at Disney during the Golden Age of Animation it was an effective way to achieve certain kinds of special effects and other visual gags that called for its use, especially during the WWII era.
In the Disney Studios LAYOUT MANUAL there is an extensive section on the use of sliding cels that includes rotation cels construction and uses, rotation cels plus animation, double rotation cel, sliding cels, sliding cel wake-smoke, sliding cel bubbles, sliding cel dots, arrows, pivot cel, sliding cel water and a contraption called a sliding cel pivot bar (1). All of these methods were developed for specific effects from simply rotating a piece of static artwork such as plane to simulate “flying” without actually creating cel animation to generating special effects like water and smoke without animating that by hand. If done well, these types of animations could be very convincing and give the illusion of higher production value without the expense. For the WWII training and other government contracted films that had small budgets these were effective techniques to maintain the quality that differentiated the Disney Studios from others in the film industry.
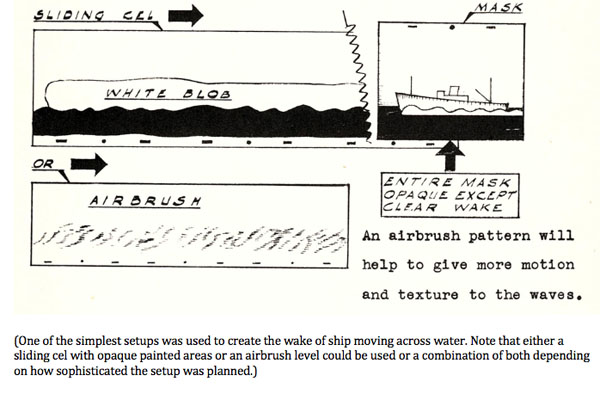
The LAYOUT Manual sliding cel section discusses all these basic uses for the simple sliding cel including “a whole raft of animation effects” that “can be achieved under a female mask.” A female mask being cutout openings, windows if you will, of various shapes that work with a second piece of artwork. When one element, say the female mask, is held another element is panned underneath it to create an effect such as a vessel’s wake, smoke from a ship’s funnel stack, bubbles and other special effects used to enhance static artwork of ships, plane and other objects (2).
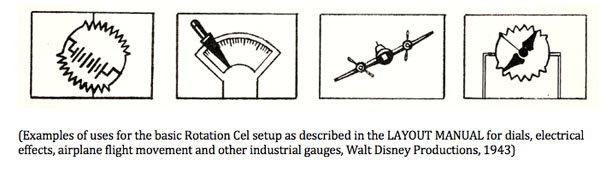
Stepping up from that basic method of sliding cel is the rotation cels which the manual states at the opening that, “rotation movements, such as wheels, dials, pie slices, etc., rotating around a fixed center, and with a fixed radius, can be achieved by use of an affair known as a Rotation Cel.” The text sites Verne Papineau, a “cartoon checker,” and Homer Amos, an “animated cartoon coordinator,” as having used rotation cels “to simplify the handling of some baffling intricate effects in a way that would actually flabbergast you (3).” The manual was not above a little personal commentary.

The rotation cel setup consists of two cels or levels. In the LAYOUT MANUAL, the bottom cel is described as being “6 ½ Field, 3 pan” element that is either using the top or bottom pegs on the camera table. The second cel in this setup is “cut to the shape of a circle with one portion stretched into a pointer,” (see diagram). The circular cell with the stretched pointer “is attached to the bottom cel by means of a small central disc around which it revolves” following a calibrated arc, that determines the speed of the rotation move, which is out of view of the camera field on the bottom cel.
The 6 ½ Field (4) in Acme terms is a 14.44 Field . Whenever there is a reference to a 2, 3 or more field pan cel or level of art, it means that the cel or art level is on a long piece of paper or cel. The height of the paper/cel is the same as the standard animation paper/cels but the length will vary depending on what the scene may call for in terms of panning art. Visualize it this way, if you taped three pieces of animation paper or cels together end to end, you’d have a 3 field pan paper or cel. This long pan paper and cels were made in varying lengths so that there are no seams, just one continuous length as needed.
The ROTATION CEL setup was used instead of a camera rotation when the pivot-point was off center. It was much easier to achieve an off-center rotation using the rotation cel setup described above than trying to create it doing a camera rotation unless you were using the optical printer to achieve the desired effect. The manual notes, rather sarcastically, that “you could complicate everything even further by putting the gadget [cel rotation setup] on North-South pegs…and add an overlay on top pegs (5).”

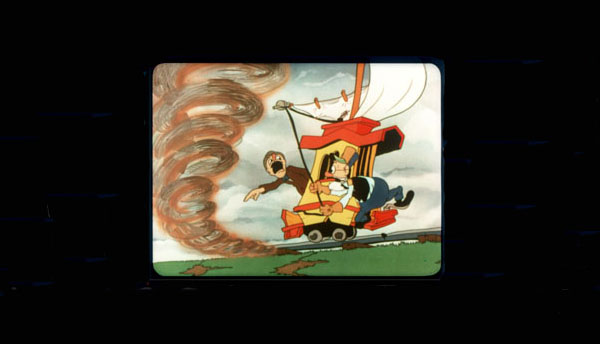
For this author, some of the fun of working on Disney animated features was occasionally making some kind of gadget or set-up to achieve a particular effect. What falls outside the film frame doesn’t matter as the audience will never see it but it is those types of kluged together setups that can make all the difference in a scene. The LAYOUT MANUAL makes that clear in some of the examples like a two rotation cel setup that was used for the Minneapolis Honeywell Project (Prod. 2659) for the U.S. Army Air Corp, which was a classified training film on the C-1 Auto Pilot. In Sequence 2, scene 146 of the film, the two rotation cels “gave the effect of a side view of a plane’s tail, rising and falling as the tail surfaces [ailerons] were lowered or raised (6),” see diagram. The rotation center of the plane’s fuselage is out of field while the pivot point for the aileron is on screen, albeit camouflaged by the artwork so the viewer is unaware of it. The effect is clear and precise with the animation for the shot being created completely under the camera.
The LAYOUT MANUAL gives the details of constructing the rotation cel in a rather tongue-in-cheek description stating, “For those whose fingers itch to build things, here’s just how to do it: Cut out of a 6 ½ F [Acme 14.44 Field] 2 pan cel, the circle-plus-pointer. The length of the pointer is determined by the size of move per frame—small move, longer pointer. Obviously, the longer the pointer, the larger will be the calibration division at the pointer’s extremity. This makes it easier for the harassed cameraman—if you’re interested in the good neighbor policy. However, the length of the pointer is also conditional upon the distanced travelled. Usually, in moves requiring 180 degrees, the rotating cel is a simple circle with the calibrations inked thereon and a marker placed on the fixed cel. (7)” Did you get all that? These direction are not as fully fleshed out as they could be if a technical writer had done a pass at properly explaining the process in a more detailed step-by-step description, which would have been more helpful in historical terms. Although, there is enough for the experienced layout artist and cameraman to understand.
The instructions for making a rotational cel continue with, “before the fidgets set in let’s get on with the actual hammer and saw. In the center of the circle part of our revolving cel, carefully cut a hole NOT LESS THAN ¼” in diameter (using the metal point of a rigid compass) and sandpaper it gently for it must be smooth.” As you can see, this is very much a handmade setup and not the first time that sandpaper has been employed in creating a useful device in animation production. Yours truly kept sandpaper on my animation desk for use in the creation of “slot gags,” which will be covered at a later date. The text continues, “sand also the plug you cut out and cement it (with Di-acetone) to the bottom cel, at the point around which the rotary movement will occur.”
Diacetone alcohol is an organic compound used as a celluloid cement for fusing cel material together, which was common at that time in the studio setting. It is classified as a flammable liquid that is also an irritant to skin, eyes and can cause headaches, dizziness, and lightheadedness as well as liver and kidney damage. But it is not known to cause cancer like other chemicals used in the Studios animation process, particularly in the Xerography department in later years.(8)
Once the plug has been cemented to the bottom cel, the circular rotating cel will then fit onto the plug allowing free rotation. Now, a cap must be created that is “not less than 3/8” in diameter” that is then cemented onto the smaller plug, which the circular cel is sitting over. The cap acts as a lock to keep the circular cel in place to rotate freely around the plug. “The center cap can be as large as convenient… the larger, the more sturdy the gadget will be, but 3/8” diameter is the minimum. The cap must, of course, be concealed by the painted material.” (9) It is a simple yet effective setup for a stable rotation cel setup.
The method described was used “to eliminate” an extra cel level in the Minneapolis Honeywell Project (Prod. 2659) example mentioned earlier “because there were TWO rotating cels used at once. They were assembled as indicated in this example:

The aforementioned is the basis for rotation cel construction and there are many variations to this method. The LAYOUT MANUAL makes note that “Homer Amos’ method has some personal variations for the manufacture of rotation cels including a super-dooper secret vulcanizing liquid. However, the manner of assemblage is essentially the same.”(10) Homer Amos, an animation coordinator, was cited several times in the manual for the creation of various setups to help facilitate animation quickly while still maintaining the Disney quality. Amos may have started out as a coordinator in the layout department but with the references to him in the LAYOUT MANUAL he likely moved up to an assistant charged with working out these types of sliding cels, rotation cel setups and other gadgets.(11)

As stated before in previous installments, much of the invention and ingenuity that was employed in the WWII training films came out of budget and time necessity. The traditional animation process had its limitations in context of budgets so the artists and technicians made ingenious gadgets and setups. These setups were used to create visually satisfying animation that showed and/or explained often complex concepts to help easily train military personnel. It is worth documenting these methods so that they are not lost to time but rather are recorded to history with some commentary.
Next month, an exploration of double exposures, dissolves, diffusions and distortions which truly show of the capabilities of the animation camera and its importance to the animation process at the Walt Disney Studios.
©David Bossert 2020
1. The ROATION CEL pages, Layout Manual, Walt Disney Productions, 1943; authors copy.
2. The SLIDING CEL pages, Layout Manual, Walt Disney Productions, 1943; authors copy.
3. The ROATION CEL pages, Layout Manual, Walt Disney Productions, 1943; authors copy.
4. Field Size Comparison Chart: Disney vs. Acme, courtesy Hans Perk.
5. The ROATION CEL-USES page, Layout Manual, Walt Disney Productions, 1943; authors copy
6. ROATION CEL CONSTRUCTION page1, Layout Manual, Walt Disney Productions, 1943; authors copy
7. ROATION CEL CONSTRUCTION page 2, Layout Manual, Walt Disney Productions, 1943; authors copy
8. New Jersey Department of Health, Hazardous Substance Fact Sheet; Diacetone Alcohol; May 2003
9. ROATION CEL CONSTRUCTION page 2, Layout Manual, Walt Disney Productions, 1943; authors copy
10. ROATION CEL CONSTRUCTION page 3, Layout Manual, Walt Disney Productions, 1943; authors copy
11. Title and location with in the Animation Building at The Walt Disney Studios between 1940-1941 verified by Joe
Campana through Disney studio directory.
 David A. Bossert is an award-winning artist, filmmaker, and author. He received his B.A. from CalArts School of Film and Video with a major in Character Animation. As a 32-year veteran of The Walt Disney Company, he contributed his talents to The Black Cauldron (1985), Who Framed Roger Rabbit (1988), The Little Mermaid (1989), Beauty and the Beast (1991), Aladdin (1992), Tim Burton’s The Nightmare Before Christmas (1993), The Lion King (1995), Fantasia/2000 (1999), and the Academy Award-nominated shorts Runaway Brain (1995), Dali/Disney Destino (2003), and Lorenzo (2004), among many others. Bossert is now an independent producer, creative director, and writer.


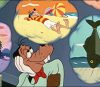


Anyone who has seen Jonny Quest is familiar with sliding cels. Practically anything in that show that moved from place to place — planes, boats, hovercraft, Race Bannon swinging from a rope — did so by sliding horizontally across the background. In the context of a good story, with effective music, it worked!
I’m intrigued by the rotation cels; I had always imagined an elaborate mechanism with gears, but the setup described in the Layout Manual is strictly ad hoc, adapted for the specific job at hand. Some wonderful effects can be achieved with multiple rotation cels. I remember one example (though I can’t recall the name of the film) where two rotation cels with parallel or radiating lines were rotated in contrary motion over a panning background of abstract colour, creating a beautiful moving lattice pattern. Combined with the music, the effect was magical; but it would have been quite easy and economical to create.
Can you give examples of some of the gadgets or setups you created for use on Disney animated features that were especially fun to work with?
“Sliding Cels” (the East Coast term for Pan Cels) were in use from the very beginning, once animation photography became mechanized, largely in the 1930s. Pan Cels were put into greater use for Limited Animation for television and educational/PR films for cost savings. They were well in place for over a decade before JONNY QUEST, and were a major element in Hanna-Barbera’s production methods, as well as all others.
We used a lot of slot gags that were typically two elements, one that remained stationary and one that had a sliding cel which panned underneath. These were used to create sparkles, a starry night or magical effects. Often these setups were used in conjunction with filters on the camera, i.e. color or diffusion filters. I will be covering the camera effects in the next installment.