

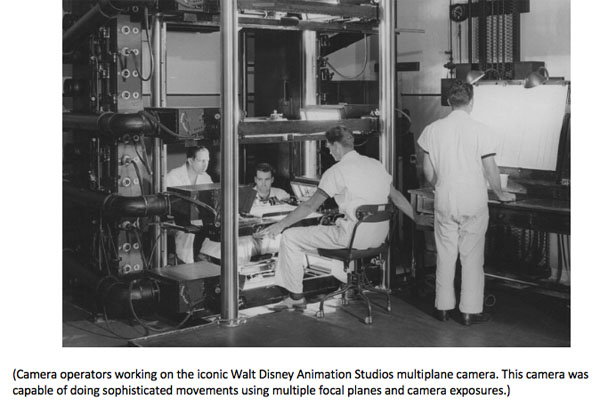
I can tell you from personal experience that one of the more fun aspects of creating visual effects animation, outside of actually animating, is enhancing that animation using camera operations. These operations can involve a simple double-exposure in which the film is exposed twice, usually creating a transparency effect for one element, or it can include many exposures on the same piece of film using different filters. The art of this, aside from the actual artwork, is the creativity in coming up with the right combination of operations to create the desired effect on the film.
The LAYOUT MANUAL starts with a fundamental explanation of photographic exposure, which is “the process of lightening an area of dark film. The unexposed film, when printed, produces a completely black print.”1 So, if the film is unexposed, it creates a black print, then fully exposed film creates an evident clear frame if light or a white card is photographed. The text continues, “as more and more light, or exposure is allowed to strike various parts of the film, the silver content of the emulsion becomes progressively less, upon printing, in those areas where more light is added, and consequently, the print becomes progressively lighter. In other words, light can be added but not subtracted; the film can be made lighter but not darker.”2 Simply put, you start with black, 100% emulsion on the film, and can lighten areas to 100% exposed film or no emulsion left on the film, which creates an apparent clear area on the film. So, you have 100% of the emulsion to “play” with to achieve various effects on film.

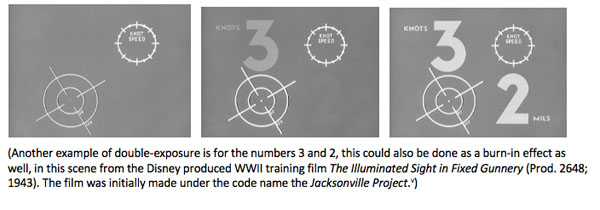
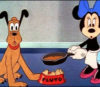
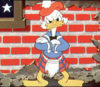
One of the most fundamental effects is a double-exposure. This effect is where a scene would be exposed twice on film at different percentages for each of the two passes or exposures. For instance, if you want to create a transparent shadow on the ground under a character. The scene elements would consist of a painted background, the character animation painted on the cel, and the shadow animation painted as an opaque black shape on cel as well. The entire scene (background, character animation, and shadow) is filmed say at 40% exposure for the first pass. Then the film is rewound in the camera back to frame one, and then the scene is reshot, the second pass, at 60% without the shadow element. That makes the full scene exposed at 100%—40% plus 60%— with the shadow element transparent since it is only exposed at 40%. This effect is evident in countless films such as the clown shadows on the tent in Dumbo (1941), which uses several different exposure percentages to achieve different transparent shadow densities, as in the example above.

The manual does point out that “the process of doubling-in shadows, although using two exposures, is not true double exposure, so when we speak of “double exposed shadows,” we are actually at fault. They are UNDEREXPOSED areas of the background, even though they must be introduced into the scene by means of two exposures.”3 Think of it in terms of the opaque shadow on a cel, which acts as a mask over the background that is exposed at 40%. The cameraman rewinds the film to frame one of the scene, and then the background exposed again without the black shadow cel. The result is the area where the shadow was in the first exposure hid the background, thereby “underexposing” that one area making the background darker in that spot after the second pass. The terminology “underexposed” may be accurate. Still, over the years, the nomenclature of double-exposure, or “DX” for short, concerning shadows and other effects, has become the norm in communicating such camera instructions.
As a side note, in the early 1930s, there was a transparent paint used to create shadows on cels, but it proved to be problematic. The transparent paint lacked control and consistency in its density appearance and tended to “crawl” or “boil” when viewed at film speed. Creating shadows under the camera using opaque black painted shapes on the cel and then exposing it at a percentage gave a more uniformed consistency to the shadow. It also afforded control over the density or level of transparency desired. Double-exposure became the standard for doing shadows at Disney even though other processes came and went over the years.4
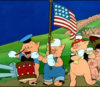
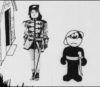
The LAYOUT MANUAL gives a clear definition of what film exposure is, stating that “100% exposure is considered as being that exposure of the negative which will produce a print where the various tones from black to white most faithfully reproduce those of the original subject.” At that time, there was not a photographic process that reproduced the exact tones and values of the original artwork. Often, dark color values merged or “flattened out in contrast and come closer in value” becoming indistinguishable on film.6 The same goes for “other end of the scale, in the region of whites, the values also tend to flatten out and lose contrast.” In an exposure of 100%, white accentually produces a transparent print that transmits 100% of light when projected. The manual points out that “it is impossible to transmit more” that 100% of light. But if exposures of 200% or 300% are made, then a “flare around whites as well as background fog will result.” The effect is referred to as a “burn-in” and maybe the desired or not depending on the effect that the scene requires.

A burn-in of an effect is when there is up to 100% exposure of white light, or a white card is “burned in over any other value or color whenever desired.” The manual uses the example of a double-exposing of a white title over any other artwork. Typically this is best achieved over darker artwork. Say the background is in the darker value range, then burning in a white title will create greater contrast between the lettering of the title and the background art making for more readability of the title. At a 100% exposure, there is no more emulsion on the film; it is clear in the area of the lettering, making them white. As explained, the exposure can be higher than 100% but then flaring, and potential fogging on the background will begin to occur around the lettering.

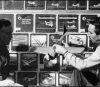
(An example of a ripple glass like effect from The Old Mill (1937). There were various methods experimented with to distort artwork like the reflection of the mill on the pond water surface. Ultimately, the ripple glass was the most effective and efficient way to create these types of effects. These examples are best viewed in motion.)
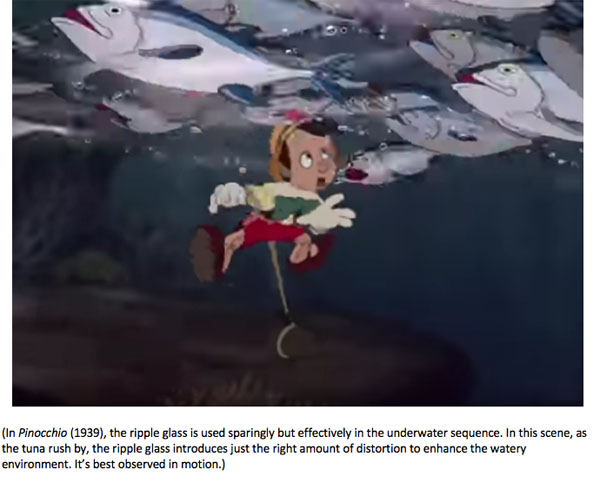
Armed with the knowledge of double exposures and burn-ins, the only limitation is that of one’s imagination and vision for a scene. Both of these techniques can be used separately or in combination plus any number of an array of filters, ground optical ripple glass, and color gels to enhance and create special visual effects. The filters range from light to heavy diffusion to add softness to an effect; star filters, multi-image filters, and even custom made filters. The ripple glass, in the camera department, consists of special patterns ground into the optically clear glass to create underwater effects like those used in numerous WWII films as well as many of the animated feature films over nearly fifty years. Examples are plentiful for using ripple glass or other distortion techniques to create the underwater sequence in Pinocchio (1939) to the distorted reflections in the water of The Old Mill (1937) to the smoldering smoke in a scene at the end of The New Spirit (1942).

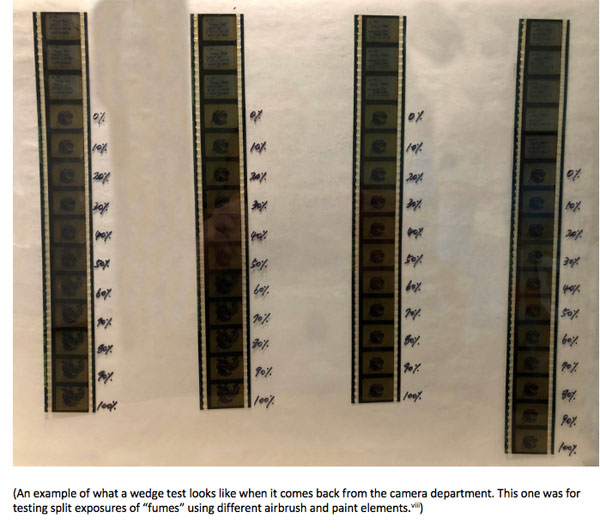
Although the camera department created a set of “density cels, photographically correct, which makes things very simple” for the layout artist and the effects animators as well, they also supplied “a WHITE PERCENTAGE stick, graduated from Black to White in steps of 10%. By matching to this stick, the percentage of white in any gray can be determined.” The density cels and white percentage stick were useful references, but often the effects artists would have a “wedge test” shot by the camera department for more accurate information when planning out the effects in a scene. A wedge test is a series of film frames that have incremental differences in exposure, filters, and color that are used for choosing the final look for an element or the entire frame.7 More often than not, a special effects animator would run multiple tests at once and get back a series of film strips from the camera department. Those film strips would then be looked at frame by frame, either with a loop on a lightbox or projected using a filmstrip projector. Yes, like the one you remember from elementary school. The test film allowed the effects animator to choose which exposures, filters, color gels, and ripple glass to use for a particular scene. If done correctly, the scene could be shot in camera once with the desired results.


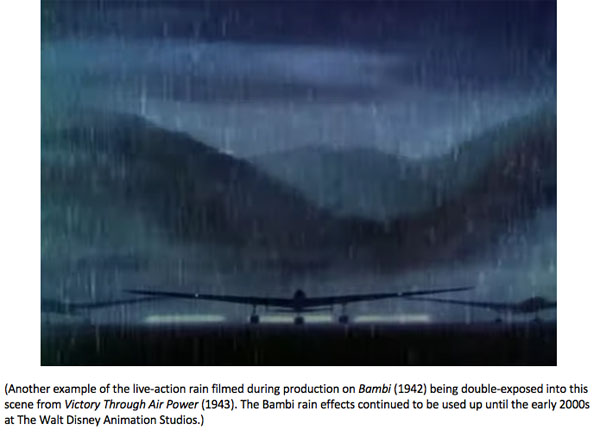
The use of a wedge test was especially important when using live-action effects elements such as rain or snow to an animation scene. The studio had filmed live-action effects on one of the sound stages and built up a stock library over the years. Live-action effects elements were used in features like Bambi (1942) and Pinocchio (1940) to enhance the “illusion of life” further. These elements continued to be used decades afterward and can be viewed in a number of the WWII films and even features like The Little Mermaid (1989), Beauty and the Beast (1991), and Pocahontas (1995). The rain or snow was filmed against a black card, creating black and white contrast of the effect against the black background.

All of these camera techniques in the hands of an experienced layout or effects artist can produce efficient, often low cost and high-quality enhancements to animated scenes. But, it can also do the opposite in the hands of an inexperienced artist, causing wasted time and expense. Layout, Effects, and the Camera department working together, especially during the WWII era at the Disney Studios, created propaganda and much-needed training films for the war effort. It was through internal publications like the LAYOUT MANUAL that many of these techniques were documented for new artists and technicians to learn and reference to keep productions following smoothly and swiftly. Many of the methods were also passed down from artist to artist, expanded and refined over time. Sadly if not for the documents like the LAYOUT MANUAL and other surviving notebooks, many of these techniques have been lost to time.
©David Bossert 2020
FOOTNOTES
1 – The Double-Exposure pages, Layout Manual, Walt Disney Productions, 1943; authors copy, pg. 52.
2 – The Double-Exposure pages, Layout Manual, Walt Disney Productions, 1943; authors copy, pg. 53.
3 – The Double-Exposure pages, Layout Manual, Walt Disney Productions, 1943; authors copy, pg.54.
4 – Author’s personal knowledge and experience at the Walt Disney Animation Studios.
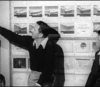
V – From the film The Illuminated Sight in Fixed Gunnery (Prod. 2648; 1943), additional reference from Shale, Richard Allen, Donald Duck Joins Up: The Walt Disney Studios During World War II, The University of Michigan, Ph.D., 1976, Appendix C, page 292.
6 – The Double-Exposure pages, Layout Manual, Walt Disney Productions, 1943; authors copy. Pg. 53.
7 – Visual Effects’ Glossary, the Rebel Alliance Network Knowledge Bank Index.
viii – Wedge Tests created by author for an episode of The Ren & Stimpy Show (1991—1995).
 David A. Bossert is an award-winning artist, filmmaker, and author. He received his B.A. from CalArts School of Film and Video with a major in Character Animation. As a 32-year veteran of The Walt Disney Company, he contributed his talents to The Black Cauldron (1985), Who Framed Roger Rabbit (1988), The Little Mermaid (1989), Beauty and the Beast (1991), Aladdin (1992), Tim Burton’s The Nightmare Before Christmas (1993), The Lion King (1995), Fantasia/2000 (1999), and the Academy Award-nominated shorts Runaway Brain (1995), Dali/Disney Destino (2003), and Lorenzo (2004), among many others. Bossert is now an independent producer, creative director, and writer.


Thanks for this post, Dave. I suppose that with Digital techniques, wedge tests are no longer made. You can see the results of “burn-ins” and DX techniques immediately. I am fascinated by the “transparent paint’ that was used in the early 1930s, I like the crawling effect it had, keeps the shadows “alive”. Do you know what chemicals it was made from? I think it had a very strong odor, which I learned in conversations with ink and paint veterans. I’ve worked on commercials that used gummed “shading sheets”, pasted on to cels that worked as shadows. An extremely fine dot pattern was used in the sheets. The effect crawled a bit, but looked real home-made, not like double exposed shadows.
Hi Mark,
Yes, that is correct, they don’t shoot wedge tests on film anymore. On digital systems it is instant as you can look at different percentages immediately and compare them to get the right look. As for te transparent paint, I don’t know what the chemicals or binders that were used. I do remember about the strong odor.
The shading sheets you mentioned were made under different brands. I remember Letraset and Letratone, which you could get in different dot patterns and densities. The also were the company that made fonts as well on sheets. The good old days! LOL!!
Thank you,
-Dave
Thanks for another great instalment! I find this one probably the most interesting so far, because it explains a lot of the effects I’ve noticed in animated films over the years. I had no idea double-exposure was used to create shadows; I always assumed it was some sort of translucent paint on the cels, but your side note indicates that I was at least partially right.
There must have been a lot of experimentation in refining the use of the ripple glass, so that the amount of distortion and motion in a given scene was just right. As an experienced diver I can tell you that the underwater environment does not ripple in that way at all, unless there’s something wrong with your mask or you’re suffering from nitrogen narcosis; but in film the effect does convey an impression of the density of the medium.
Hi Paul,
I appreciate your comments. Yes, there was always experimentation but ultimately there were some standards achieved that then were passed down from artist to artist. I here you about the “underwater environment does not ripple” like that as I am a diver too. What the effect does is bring the viewer into the environment. If you watch The Little Mermaid, we used the ripple glass at the beginning to bring the audience down into the underwater world and then it goes away. It was used sparingly at the right monets and the rest of time underwater scenes didn’t have the ripple galss but used “light patterns” on a few surfaces in a scene to convey the underwater envirnment.
Thanks for reading.
-Dave
Another fine article David but you may wish to change how light changes emulsion.
Unexposed raw stock starts off with a thin coat of emulsion. When exposed to light it binds itself to the clear film base. When the film goes through the developer, the under exposed portions of the image gets washed away, leaving a negative image. What was bright in real life is rendered dark and what was dark is rendered almost clear; that’s why it’s called a camera negative.
What you’re describing would be true for reversal film stocks like Color Reversal Intermediate (CRI), Eastman Commercial (ECO) or Kodachrome. For 3 strip Technicolor we used Plus-X negative (a black and white negative) and for single pack, any number of color negatives (ending with 5247).
The way you describe how light works on film is great (just leave out the part about how emulsion works).
Hi David,
The exposure and emulsion information is from the layout manual. It is discribing what the exposure effect looks like on a positive, not a negative, print.
Thanks for your comments.
-Dave
Concerning ripple glass effects, you may wish to mention that it was easier to perform when the glass was at a different plane of focus than the animation. The ripple glass worked best when it was several inches (if not feet) away from the glass platen which held cels down against the background.
If the entire image was to have the effect, we’d have the glass near the lens (on the shadowboard which kept the camera lens from being reflected in the platen glass). A lot of underwater scenes were shot this way.
If only part of the image was to have the effect, like a pool of water within a scene, it would be multiplaned beneath. A multiplane camera was not necessary if you had a camera stand with a litewell which allowed a lower level. Another way was to bi-pack a matte when shooting the unaffected areas and then re-exposing the negative with the opposite matte with the ripple glass.
Scenes like at the end of “The New Spirit” could be shot In any number of ways. The easiest one to explain would be to shoot it twice (not fun with a multiplane truck-in) once with the normal cel set-up at 100% but with the smoke cels painted black and then re-exposed with everything in black except for the smoke cels (in their normal color) with a ripple glass at 100%. (Yes at a 100% because the ripple glass distorts the image to create a transparent effect around the edges of the smoke drawings! You would get a solid interior and a transparent edge to the smoke.) But I’m not sure that’s the way they did “The New Spirit”. I’d have to see a better image and in motion!
My favorite ripple glass was the one they had at Fleischers/Famous which was used in several productions. And everyone talked about the day (in the 80’s?) when someone at Disney dropped an important sheet of distortion glass used on “Pinnochio”!
You showed some wedge strips for “Ren & Stimpy” which reminds me of a double-exposed, underlit, multiplane, ripple glass effect I created on-the-cheap for a scene. In “Stimpy’s Invention”, Stimpy is looking at a test tube where the bubbles float down. The bubbles are reflected in his face. Those bubbles were underlit with a ripple glass on the shadowboard, double exposed onto the camera negative at a different level with a green filter in front of the lens. The ripple effect was a small piece of shower glass!
Hi David,
OMG! I remember when that ripple glass from the Pinocchio era was broken. Someone in the camera department did it either doing the setup or just plain dropped it. What a shame that was.
Thanks for your valuable comments.
-Dave
If I remember correctly, that particular sheet of ripple glass had been nick named “The Rosetta Stone” because it worked equally well with 3 effects: water, fire and smoke. Highly unusual. I don’t remember the circumstances of how it got dropped (and shattered).
And yet one more note, this one concerning exposure!
A great example of the different techniques of shadows and exposure is to look at the early productions of Casper. They tried everything to bring down the costs, finally settling with (if I remember correctly) painting him as a solid white and to hell with transparency!
And one of the biggest problems with the early days of digital and film recorders was the inability to get a decent burn in. Everything had been set up to prevent that. No matter what you did, the burn in would get perfectly exposed. Out of frustration, I remember demanding that a scene go twice through a film recorder and that’s when the techies got the message, we want over exposure!
And it’s so ironic that Pixar is so proud to introduce dust into their scenes, when we in the flat world tried so hard to keep it out!