

A question I get pretty frequently is ‘How do you make one of those DVDs?’ or something like this. I’ve broken down a few stages before on making a project, but I thought it might be useful (and maybe interesting- maybe??) to run down all the basic steps in producing a project like the ones that Thunderbean does. Of course, all of the projects have their own entanglements, but we’ll avoid the nitty gritty for the moment and just talk about was to put together a disc with the good results.
 I know for some of you folks this is *really* in the weeds, but I think this can serve as a first good step for this folks who would like to get the best results from putting together a DVD or Blu-ray, of animated films or otherwise.
Here is the condensed cream-of-wheat version of the steps!
1) The real basics! What is the project and what do you have to work with?
Having good material to work with is an excellent thing of course! If you are working on making a ‘professional’ disc or just one for yourself, many of the stages can be similar in some areas. Having a clear idea of what you’d like to put together is an excellent first step- and makes it easier to figure out what is possible to put together.
2) Capture the material onto a computer!
The generation of material will of course have a lot to do with how good your final result will be. Let’s look at the possible types of material you could put the project together with.
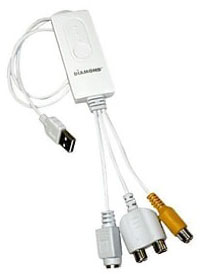
To capture:
Use a capture device of some kind. Usually this involves coming from the VHS or master deck into the computer using a USB cable. There are lots of devices out there that do this.
If your material is originally a film:
*If you are doing the film transfer yourself, try to get a frame by frame or a good ‘Telecine’ transfer or scan. This means either having the film scanned so that there is a single frame for each film frame, or a Telecine ’tape’ transfer that will allow you to remove the ‘fields’. Tape sources always have ‘Fields’. Tape (VHS, Beta or broadcast formats) have a specific frame rate depending on your country. In the states, that rate is 29.97 frames per second, regardless of the ‘speed’ the tape is running.
 If material that was originally on film is captured from tape onto a computer, it will run at 29.97 frames per second. *If* the transfer was done using a good telecine (as most professional transfers are done) then you can actually ‘remove’ the fields, recombining the frames back to the 24 frames per second (23.98) it actually was made at in the first place. This will make the footage look better by allowing it to compress for the DVD or Blu-ray better.
If you are coming from a VHS cassette: Make sure to capture the tape at 29.97 FPS. I would try to use DVNTSC as the capture format as you capture the tape.
3) Cleanup!
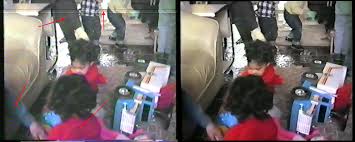
If the material is originally shot on video, one way to make the footage look as good as possible is to run it through a “Deinterlacer”
If you are on a Mac, you can determine if the material is able to have fields removed by running it through a great little free program called ‘Jes Deinterlacer’. You can find it here: If it’s useful, donate to them!
Here’s a great little youtube someone did to show how to use it to get rid of interlacing on 29.97 footage using JES:
There are other deinterlacers available as well, including using Adobe’s After Effects and other programs.
There’s lots of programs to clean up footage in various ways. There are a series of third party plug-ins for After Effects that are particularly useful. My favorite is one called ‘Denoiser II”. Neat Video is another that does a really nice job.These programs minimize the fuzz that often shows up in VHS sources.
If you are coming from film and want to make the source as clean as possible, the next stage involves digital cleanup. There are some simple, basic programs available, and others that run thousands of dollars!
I’ve used a few different ones. Here are the ones I think are best- but spendy! Only go this route for professional sets- otherwise just too expensive and *VERY* time consuming! It requires a lot of care.. and even with care, you can end up Snafuing Snafu, as one company did for me (without my asking!)
I like the Davinci Revival suite a lot.
I also like Pixel Farms ‘PF Clean’ for digital cleanup. The newer versions are now much, much cheaper than it used to be (down from nearly 10k to $495)
4) Editing!
Next, do a final edit of the material using a video editing program. Adobe’s Premeire is one of the most popular, although IMovie does just fine for most applications. I really love the older versions of Apple’s ‘Final Cut Pro’.
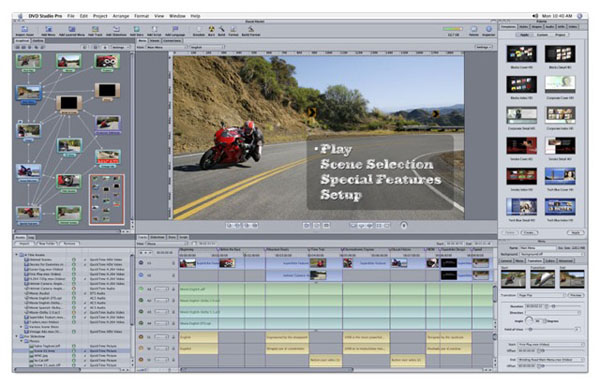
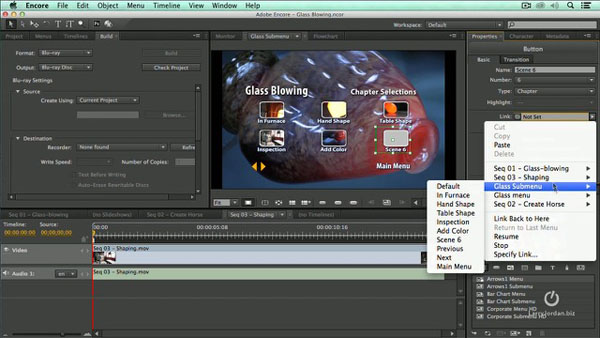
5) DVD or Blu-ray Authoring!
For putting together a final DVD, there are lots of programs! My favorite for DVD authoring program is Apple’s ’DVD Studio Pro’ . It’s not made any more as far as I can tell, but it’s a good solution for building either a simple or more complicated DVD. You can also use ‘Toast’ or a bunch of other programs to make a simple project.
Blu-rays are much harder to author and burn. The best cheaper solution I’ve found is Adobe’s ‘Encore’ program- also not supported any more. You an still get it from ‘The Cloud’ bundled with the older versions of Adobe Premeire as part of the package. It’s as good of a program as it is problematic, and I curse often when putting together a more professional Blu-ray using it.
So – there’s the basic stages on a project like these. I’ll try to get into further detail on each stage in further articles and talk about some of the things to keep in mind should you be interested in putting together DVDs or Blu-rays for you or others!
Have a good week everyone!
Steve
 Steve Stanchfield is an animator, educator and film archivist. He runs Thunderbean Animation, an animation studio in Ann Arbor, Michigan and has compiled over a dozen archival animation DVD collections devoted to such subjects at Private Snafu, The Little King and the infamous Cubby Bear. Steve is also a professor at the College for Creative Studies in Detroit.


Great article, Steve! I always love reading articles about what goes into making a Thunderbean set.
Thanks! That was really interesting and informative.
Bigger image of this – click here: https://scontent-sjc3-1.xx.fbcdn.net/v/t31.0-8/27021559_2052020471751568_3276372114345706722_o.jpg?oh=3a6c2ebfb47c14404baf108909c7bd18&oe=5B208CA8
Wow! Is this a real working machine of some type or a Tinkertoy?
Thanks for the article, Steve. I love this kind of info. I wish I knew how to do this stuff. Of course, then I’d need some film to work on — of which I have none. But it looks like great fun! I wish I had your job, or one like it!
DSan: It’s a prototype of a film chain machine that popped up on my facebook feed. If I can find out more information, I’ll pass it along.
Here’s their facebook page:
https://www.facebook.com/Gugusse16mm
One thing I noted is that the recommendation for VHS transfer is 29.97 fps. I would go as far as to say that 60 fps would work better since that’s what the VHS is throwing at you. Recording at a higher frame rate will give better results. It saves the machine from trying to decide which frames to deinterlace and makes the clean-up and editing process MUCH easier.
“How It’s Made” wouldn’t be such a popular program if it weren’t interesting to laypeople, and otherwise misaimed if were for people who make the products for 40+ hours a week.
Great stuff.
If you’re so inclined, it’s really something what you can do just on a laptop. I’ve cut together ‘tributes’ to a few favorite films & genres that friends get a huge kick out of.
Wow, Steve, this is amazing stuff! I’m still interested in how to record onto a computer directly, as opposed to using a stand alone disk burner, which I have done, believe it or not, memorizing the far too many steps to recording and “finishing” a disk, but mine were on a much simpler scale than what you’ve described, here. I’ve never really tampered with film in the ways you’ve talked about here, but I know of people who do this, and their editing jobs are seamless, even if the quality varies from one source to the other. I just wish it were all accessible to me, as I’ve complained on this forum far too many times. And, again, as always, I totally wish you luck on finishing up the FLIP cartoons; I am so psyched to check that project out. There are some folks who say that you can *NEVER* replicate the impressions of film onto a digital format, but at least there are programs that, if utilized properly, can assure that you will not ever lose a single gesture or pencil line of stunning animation in transferring the film to digital. Whether we like it or not, we need the digital transfer as we lose film history faster than we can think of ways to fully restore it. I just wish that the studios cared as much about this stuff as we do, and all I can do is mutter on and on about the lack of time and effort put in by the larger companies. I realize that they, alone, cannot do this job, but if they incorporated your kind of individual(s) and allowed the people to take their time to make sure that the end result is eye-popping and audiophonically amazing, miracles can happen.
That’s fantastic. So when are you actually going to finally release a classic animation product?
Working on it every day; trying hard to get them out the door as soon as possible ; Fleischer Rarities will be the next out.
Thank you Steve..I’m watching my mail box every day!…so far…just that….
Who does the artwork for your menus? They are very nice!